Onboarding walkthrough
A quick guided tour from Jason — the fastest way to get oriented before you dive in.
What Carousel is
Carousel replaces long static forms and the manual chasing that follows. Instead of collecting documents, IDs, bank statements, and signatures over email, you build one guided flow — a workflow — and share it. Applicants complete it on any device, and the verified results land in your Portal as structured data.
The loop: build a workflow → share its link → applicants complete a guided, verified flow → you review each submission in the Portal and export or route it onward.
The parts of your workspace
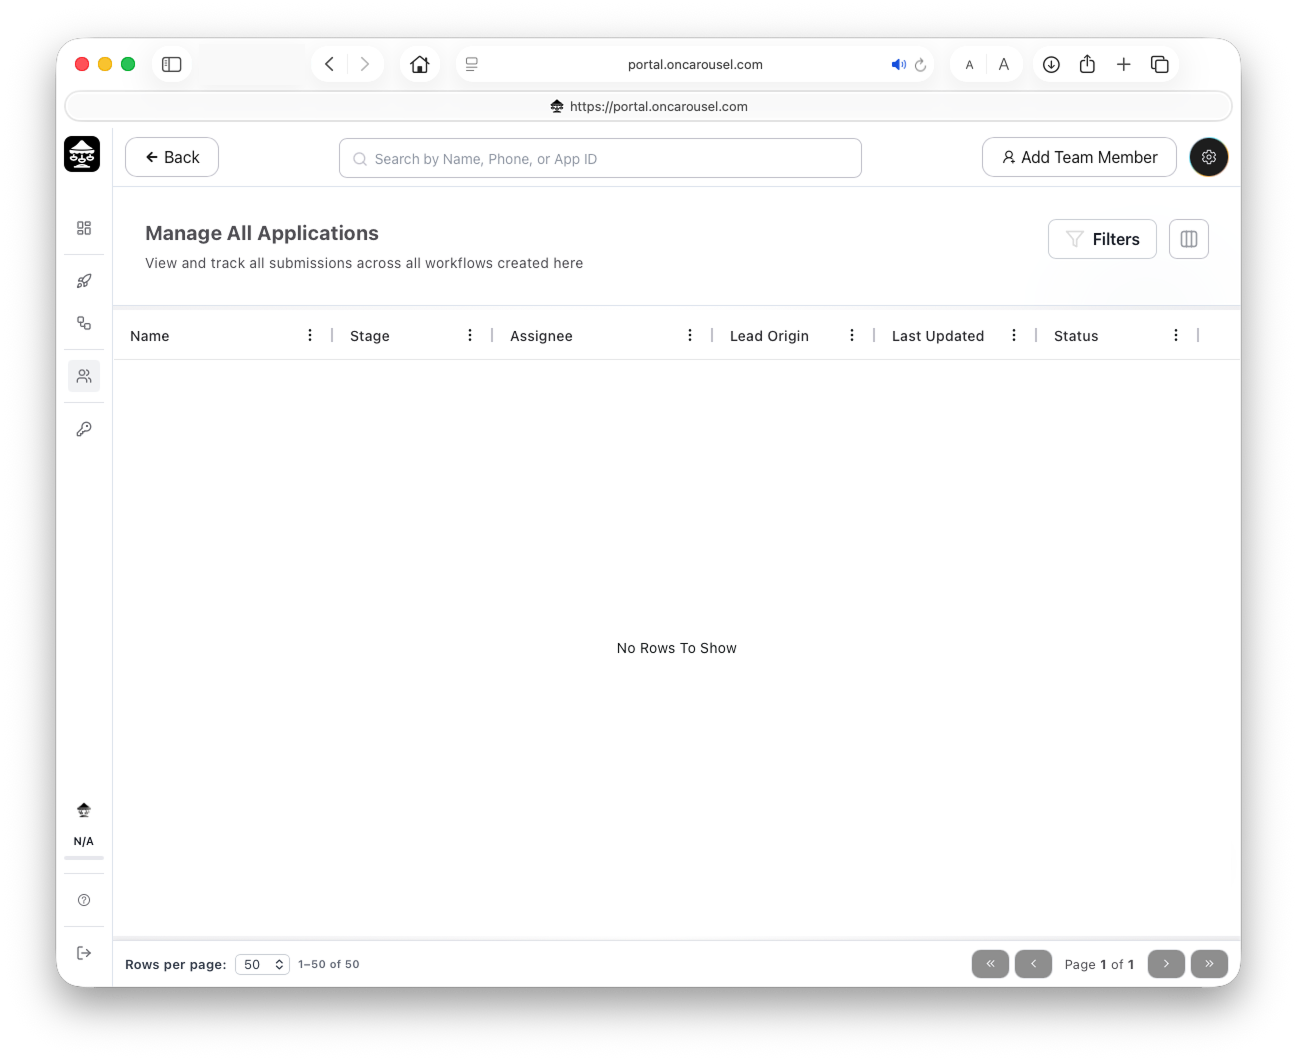
Everything lives behind the icon rail on the left. Here's the actual Portal, then the three areas you'll spend the most time in.
 Icon rail
What you're looking at
Switches between areas — Dashboard, Workflows, Applications, and developer settings.
Top bar, centered — jump to any application by name, phone, or App ID.
Top-right — invite a teammate (§08).
Top-right of the list — narrow the results and choose which columns show.
Table columns — how far each applicant has moved, and the overall state of the file (§09).
The three areas you'll use most
See & share workflows
Every workflow you've built, with its status — and the buttons to share or preview it.
Go to §03 →See your submissions
Every application that comes in across all workflows — your team's shared queue.
Go to §05 →Open & export
Open a submission to review each step and export the result as a PDF.
Go to §06 →See all your workflows
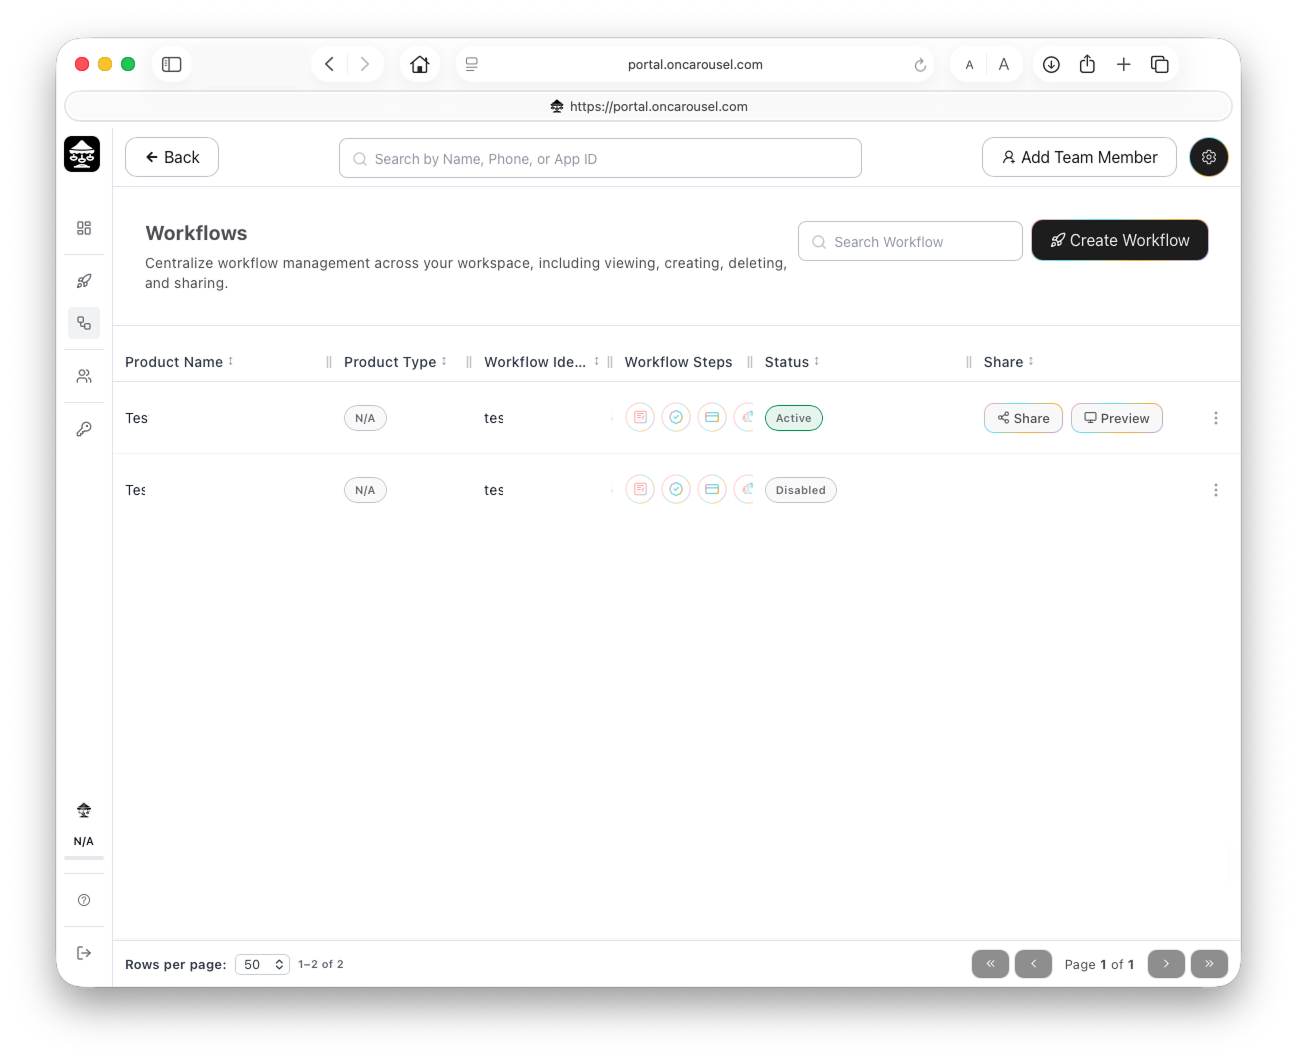
Open Workflows from the rail (the connected-dots icon). This is where every workflow you've built lives — you can view, create, preview, share, and disable them all from one place.
What you're looking at
Active = live and accepting submissions; Disabled = taken offline without deleting it.
Preview lets you see the link in action, exactly as an applicant would experience it. Share lets you customize the way you send the workflow out (§04).
The flow's steps show as icons — hover over any step to see what's included in that workflow. Alongside them you'll find the workflow's identifier (a short code that tags every submission) and product type.
Share a workflow
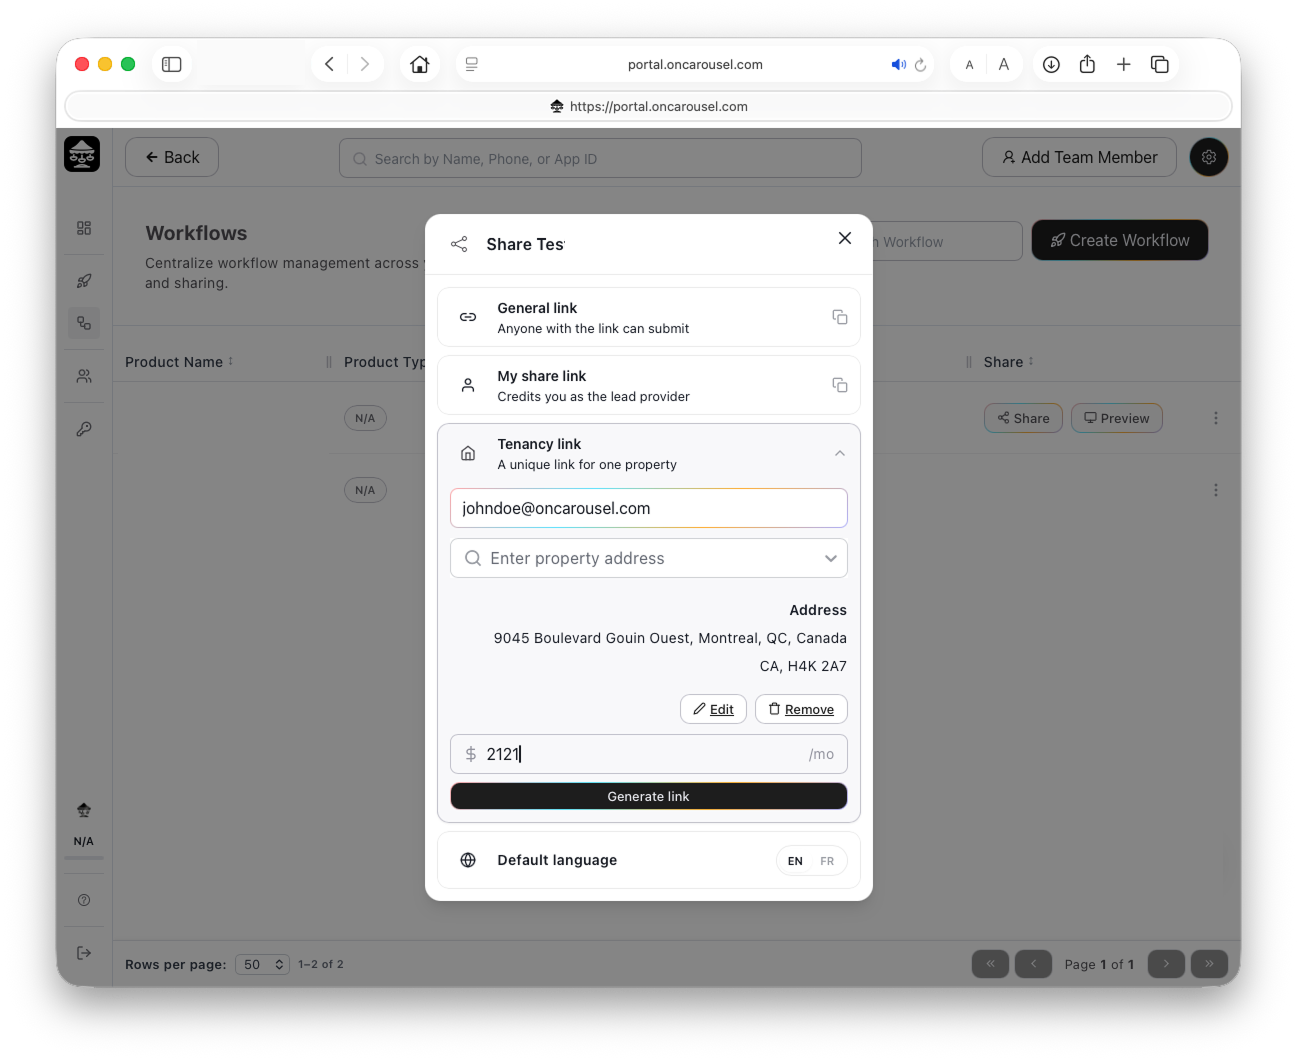
Sharing is how you actually send a workflow out to collect information. Click Share on any workflow row and pick the kind of link that fits the situation.
Which link should you use?
Anyone with the link can submit. Best for a website button, a marketplace listing, or a QR code — one link, many applicants.
Credits you as the lead provider. Same flow, but submissions are attributed to you — useful for tracking who brought the deal in.
A unique link for one property. You add your own email (as the person requesting the information), the property address, and the monthly rent, then Generate link — ideal for screening a tenant on a specific unit.
Set the default language (EN / FR) before you copy the link so applicants open the flow in the right language.
See your submissions
Open Applications from the rail to reach Manage All Applications — your team's shared queue. Every submission across every workflow lands here, newest activity first.
Reading a row
Name & phone
The applicant and their number — the quickest way to find or call them.
Stage
The cluster of dots shows how far they've moved through the workflow's steps (§09).
Assignee
The teammate responsible. Unassigned rows show Add Assignee.
Lead origin
Where the link came from — a rep, a listing, a property — so you know the source.
Last updated
When the applicant last made progress — handy for spotting stalled files.
Status
The overall state: in progress, in final review, completed, or cancelled (§09).
Finding the right ones
Use Search (top bar) to jump to someone by name, phone, or App ID. Use the Filters button to narrow by workflow, status, assignee, origin, or date, and the column button to show or hide columns. When there's nothing to show yet, the table simply reads No Rows To Show — that's normal for a brand-new workspace.
Tip: the footer ("1–50 of …") shows the true size of your queue. Filter first, then page — faster than scrolling.
Review an application
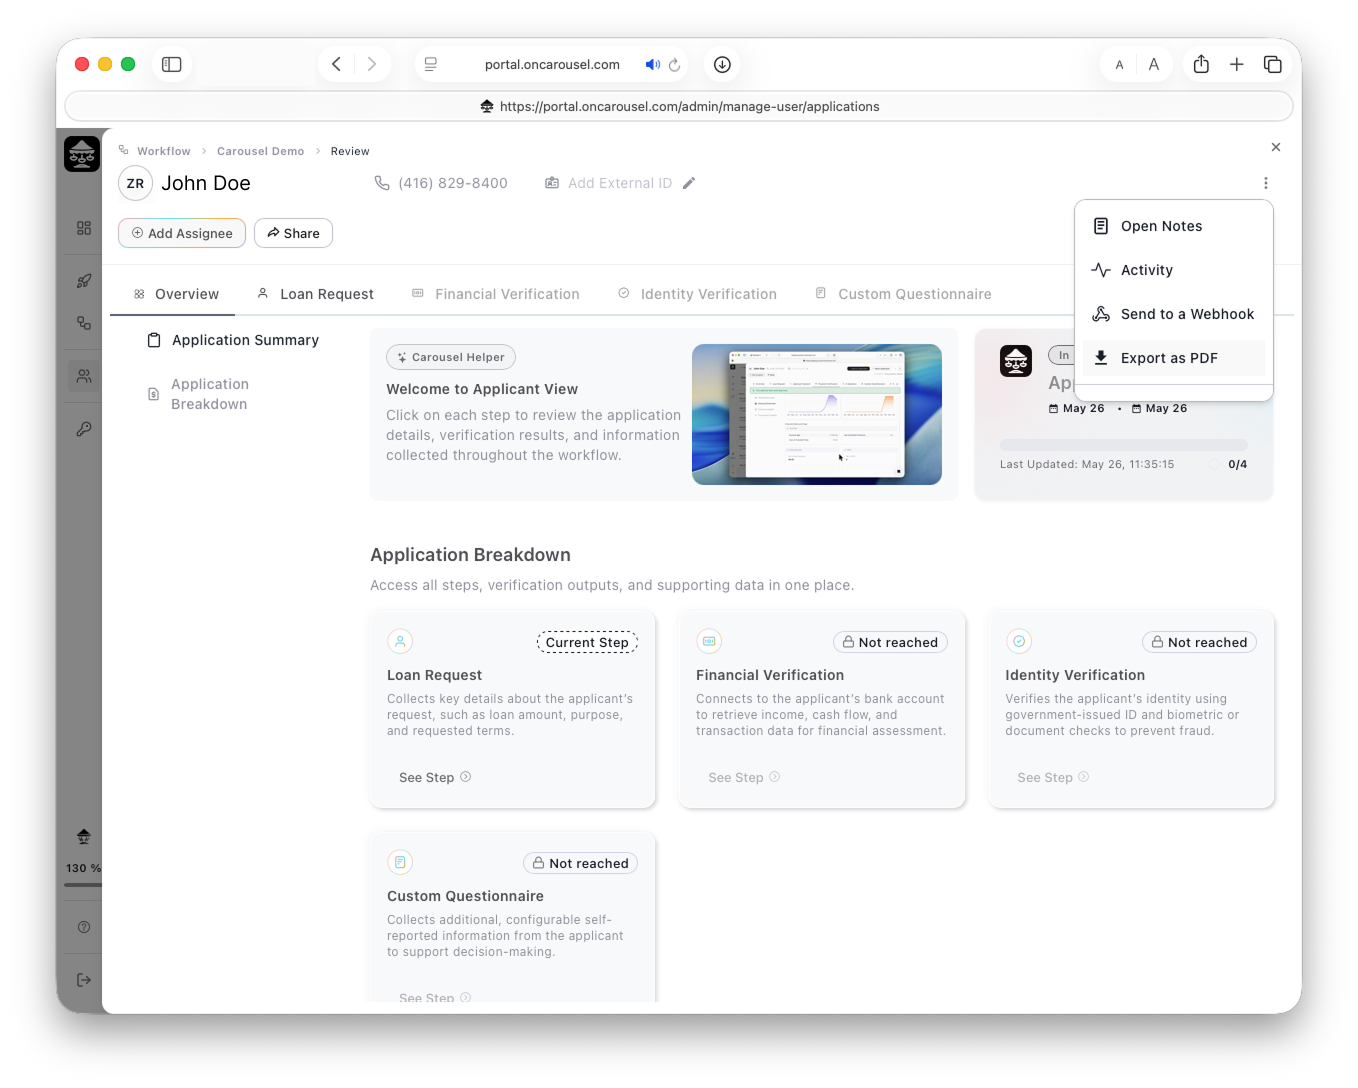
Click any row to open the full file. The header carries the applicant and your actions; the tabs are the workflow's steps; and Application Breakdown lets you drill into each one.
A few things worth knowing here:
Tabs = steps
Each tab is one step of the workflow. Click in to see the data and verification result for that step.
Step badges
Current Step marks where the applicant is now; Not reached means they haven't gotten there yet.
Add Assignee / Share
Assign the file to a teammate, or share it — right from the header.
The ⋮ menu
The kebab (top-right) holds Notes, Activity, Send to a Webhook, and Export as PDF (§07).
Export an application as PDF
Once you've reviewed a file, you can download it as a clean PDF to keep on record, attach to an email, or hand off.
Open the application
From Manage All Applications, click the row you want.
Open the ⋮ menu
Click the kebab (three dots) in the top-right of the review view.
Choose Export as PDF
Carousel generates a summary of the application and its verified steps, and downloads it.
The same menu also lets you Send to a Webhook (push the file to your CRM or another system), open Notes, or view the Activity log for the application.
Add your team
Your workspace holds your workflows, applications, and teammates. Bring colleagues in so they can review and own applications alongside you.
Click Add Team Member
The button in the top-right, available from any page in the Portal.
Enter their email
Type the teammate's email address — they'll be invited to your workspace.
Reading stages & statuses
Two things tell you where an application stands. The overall Status is the state of the whole file; the Stage is a row of icons showing the status of each individual step.
Application status
The single pill on each row of Manage All Applications.
The applicant is still working through the flow. The ball is in their court.
Everything's in — it's now with your team to review and decide. Your move.
Reviewed and finished. The file is done.
Stopped or abandoned — won't proceed.
Step statuses
Each icon in the Stage column shows that step's status by colour. Where a clay chip appears, that's the action your team can take at that status.
A good daily habit: filter to In final review assigned to you — that's the shortlist actually waiting on a decision.